Savor the Sea: Low Sodium Sushi Rolls
Looking for a healthy twist on sushi? My favorite low sodium sushi meal recipes use fresh ingredients and simple techniques for delicious results. Let's roll!

look into Right In: Sushi History and My Low Sodium Sushi Journey
Oh my gosh, there’s something magical about sushi! i still remember my first time rolling sushi at home. i was nervous—like, “what am i even doing?” but once i took that first bite of my own creation, all those nerves melted away.
It was delicious! now, you might be thinking about those low sodium sushi meal recipes that keep popping up. trust me, you’re not alone.
Having a healthier twist on our favorite sushi is something we all crave, especially if you're trying to be more mindful about sodium.
So, what is it about low sodium sushi recipes that gets everyone so excited? sushi actually has a fascinating history.
Originating in japan over a thousand years ago, it started as a method of preserving fish through fermentation with rice.
Fast forward to today, and sushi has transformed into the delightful rolls we know and love. it's super popular in america now, and you’ll find sushi in just about every corner of the country.
Whether you’re having it for lunch or enjoying it on sushi night with friends, there’s no denying sushi is the go-to meal for many!
Quick and Easy Sushi Made Healthier
Now, let’s get to the juicy details. making low sodium sushi rolls doesn’t have to be complicated. it’s actually a medium-level challenge that anyone can conquer with a bit of practice.
The best part? you can whip this up in no time! you’ll need about 20 minutes of prep time and 15 minutes for sushi rice cooking , plus a little patience as you chill and assemble.
Overall, you’re looking at just over an hour, and it can feed up to four people —perfect for small gatherings or a date night at home!
If you’re worried about costs, fear not! making sushi at home is often way cheaper than hitting the sushi bar.
With items like fresh fish or plant-based proteins and nori sushi wraps, you’ll find it’s an economical and delicious way to enjoy those sushi cravings.
And boy, do these rolls serve up a visual feast!
The Benefits of Low Sodium Sushi Rolls
Now, let’s talk health! these healthy sushi meals are packed with benefits. firstly, lowering sodium intake is a great move for your heart health, and it can help you feel more energized.
Plus, sushi is naturally rich in fresh sushi ingredients like veggies and lean proteins that give you a balanced meal that’s light yet satisfying.
And guess what? you can get creative! think sushi roll recipes featuring colorful fillings like avocado or carrots. they not only make sushi look fantastic but also add crunch and nutrients.
These rolls are absolutely perfect for special occasions. birthdays, anniversaries, or even just a cozy movie night can become memorable sushi nights.
They're more than just a meal; they’re a way to bond with friends and family over something you made yourself—seriously, nothing beats that!
So, What Are We Cooking With?
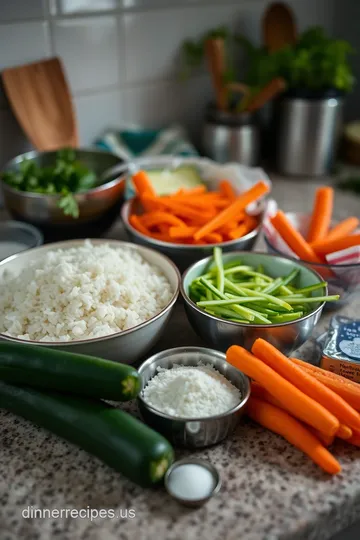
Ready to roll? the next step is gathering your sushi ingredients . you’ll need sushi rice, nori, and then the fun part—your choice of fillings! fresh fish, tofu, cucumbers, carrots, and even avocado all make great additions.
And don’t forget that low sodium soy sauce for dipping!
When you think about sushi assembly techniques , a bamboo mat will be your best friend. don’t fret if your first rolls look a bit messy! embrace that homemade charm and keep practicing.
In the end, it’s all about enjoying the ride—both in making and eating!
So there you have it! a little glimpse into what makes low sodium sushi meal recipes so special. whether you’re a seasoned pro or a sushi newbie, there’s something here for everyone.
Now let’s dive into the ingredients and get this sushi party started!
Essential Ingredients Guide for Homemade Sushi
Alright, sushi lovers! let’s dive into the world of sushi and break down what you really need to make those stunning low sodium sushi meal recipes.
If you're like me, nothing beats a good sushi roll, but you want to keep it healthy, right? so, let's chat about the premium core components , the signature blends, and a few smart substitutions.
Trust me, you’ll be whipping up those sushi rolls like a pro in no time!
Premium Core Components
First off, you gotta know your ingredients . Here’s a quick rundown of those must-have sushi components.
-
Sushi rice : you’ll need about 2 cups (400g) of sushi rice. it’s key for that sticky texture. to cook it up, rinse until the water runs clear and then follow the package instructions.
Keep that rice happy!
-
Nori Sushi Wraps : Those leafy green sheets are essential! Make sure you get the good stuff—high-quality nori is dark green and shiny.
-
Fresh Fillings : Think cucumbers, carrots, and avocado. Get what’s in season for the best taste.
Storage Tip : Keep your nori in a cool, dark place to maintain its crunchiness.
Shelf Life : Fresh fish should be consumed within a day or two of purchase.
Signature Seasoning Blend
Alright, seasoning is where the magic happens. You can’t just slap your fillings on rice and call it sushi!
-
Essential Spice Combinations : Here’s a pro tip: a little bit of salt (or low sodium salt) goes a long way.
-
Herb Selections : Fresh herbs like cilantro and mint can jazz up your rolls. Honestly, they’ll give your sushi a fresh kick!
-
Flavor Enhancers : Don’t forget about rice vinegar ! Mix 2 tablespoons (30ml) with a teaspoon of sugar—trust me, it makes a difference.
Smart Substitutions
Okay, we’ve all been there. You’re ready to roll but something’s missing, right? No sweat! Here are some common alternatives:
-
Common Alternatives : If you don’t have sushi rice, short-grain brown rice will do, though texture is a bit different.
-
Dietary Modifications : For plant-based sushi options, tofu and even grilled veggies can step in for fish. It’s all good!
-
Emergency Replacements : In a pinch, use lettuce wraps instead of nori. They’re fresh, and the crunch is divine!
Kitchen Equipment Essentials
You don't need a fancy kitchen to roll sushi, but some tools can make your life a whole lot easier.
-
Must-Have Tools : A rice cooker, a bamboo sushi mat for rolling, and a sharp knife for slicing. Don't sleep on these!
-
Prep Tips : Wet your hands while handling the rice. It keeps it from sticking like glue—thank me later!
Storage Solutions : Keep your bamboo mat clean by wrapping it in plastic after each use.
Bringing It All Together
Now that you’re armed with the best ingredients and smart tips, you're ready to explore those low sodium sushi recipes .
Remember, it’s all about keeping it fresh and flavorful while still being mindful of your health. whether you’re making sushi for a casual dinner or a fun gathering with friends, the right ingredients make all the difference.
Got those essential components down? great! because next up, we’ll get into the nitty-gritty of crafting those perfect rolls with specific instructions.
You’re going to love showing off your sushi-making skills—just wait until you pop open that fresh sushi roll!
Mastering the Art of Low Sodium Sushi Meals
Ah, sushi! that delightful bite-sized bliss that dances on your taste buds like no other. if you’re anything like me, you might think that enjoying sushi means high sodium and questionable ingredients.
But guess what? you can enjoy gorgeous low sodium sushi meal recipes without sacrificing flavor or your health. let’s dive in!
Essential Preparation Steps
Before we start rolling sushi, we need to get our ducks in a row. this is where the fancy french term, mise en place , comes into play.
It means having everything prepped and ready. chop, slice, and mix your ingredients – i promise it saves you time and stress later.
When you're making sushi, time management is everything. you want to maximize your flavors without losing your mind. it helps to set a timer, especially when cooking your sushi rice, which should be at 180° f ( 82° c) and needs about 15 minutes of simmering.
Organization strategies are your best friend here. set up your workstation and have your tools at hand. i like to line up everything: sushi rice, fillings, nori wraps, and even your dipping sauces.
Trust me, a clean space leads to clean rolls!
And please, don’t forget safety considerations . Sharp knives and hot surfaces can be a recipe for disaster. Always cut away from yourself and keep that mess cleaned up as you go!
Step-by-Step Process Awaits
Alright, let’s get rolling with some clear, numbered steps! This is where it all comes together.
-
Prepare the Sushi Rice:
- Rinse 2 cups of sushi rice under cold water until it runs clear (this will help with that sticky goodness).
- Cook the rice until it’s ready. Remember, we want it to hit 180° F ( 82° C) - about 15 minutes in a rice cooker.
- Once it’s cooked, let it sit covered for 10 minutes .
-
Season the Rice:
- Combine 2 tablespoons of rice vinegar, 1 tablespoon of sugar, and a pinch of salt. Microwave it for 30 seconds until it dissolves.
- Mix it into your rice and let it cool on a plate for 20 minutes .
-
Prep Your Veggies/Fillings:
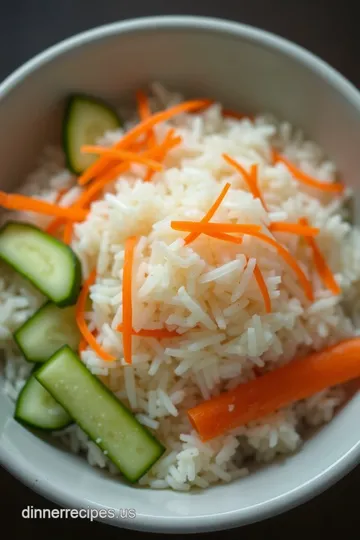
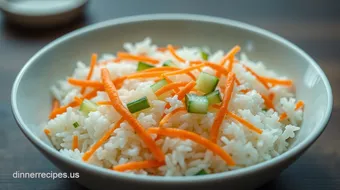
- Slice up your cucumber, carrot, avocado, and either fish or tofu. Make it colorful, people!
-
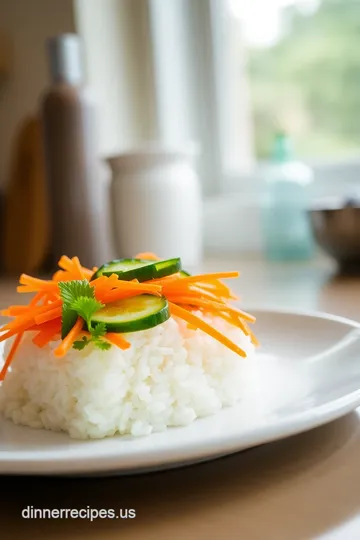
Assemble Your Sushi:
- Lay your nori shiny side down on a bamboo mat. Wet your hands and grab a handful of sushi rice. Spread it evenly over the nori, leaving at least an inch at the top without rice.
- Put your colorful fillings in the center. Roll that baby up tightly!
-
Slice and Serve:
- Using a sharp knife, slice your roll into beautiful pieces – about 6 to 8 works well.
- Serve with low sodium soy sauce or tamari for dipping.
Expert Techniques to Elevate Your Sushi Game
Let’s talk about some expert techniques that can really elevate your sushi game.
First, don’t overfill your rolls. it can go from dreamy to disastrous in a second! balance is key here. always check for quality checkpoints : fresh ingredients make all the difference.
If something looks off, don’t use it!
Now, if you're new to sushi rolling, it's totally normal to have a hiccup or two. troubleshooting tips : if your sushi falls apart, just claim you made a sushi salad! it’s all part of the fun.
Success Strategies
Finally, let’s hook you up with some success strategies to nail those sushi rolls every time.
Common mistakes to avoid include not wetting your hands; trust me, the rice will become your worst enemy otherwise. be sure to use only fresh sushi ingredients – that makes every bite worth it.
Now, if you're short on time, take advantage of make-ahead options ! prep your sushi rice and fillings a day before.
When you're ready to roll, it’s a quick assembly line of deliciousness!
Now you're all geared up to impress with your low sodium sushi recipes . So grab a friend or two and dive into some delectable homemade sushi.
Stay tuned for more tasty tidbits in the next section: Additional Information !
Pro Tips & Secrets for Perfect Low Sodium Sushi Rolls
So, you wanna dive into the world of low sodium sushi meal recipes ? guess what? i was right where you are not too long ago.
The first time i rolled my sushi, it ended up looking more like a sad burrito than a fancy sushi roll.
But with some tips and a pinch of patience, trust me, you’ll be rolling like a pro in no time!
Chef's Personal Insights
Here’s my secret: fresh ingredients are a game-changer. seriously, the freshness of your sushi fillings—be it the fish, the veggies, or even the nori wrap—makes all the difference.
I like to hit up the local farmer’s market for crisp veggies. and for sushi-grade fish, don’t be shy about asking your fishmonger for recommendations.
Time-Saving Techniques
Now, let’s talk speed. if you’re short on time (which, let’s be real, who isn’t?), pre-cook your sushi rice a day ahead.
Store it in the fridge, and when you’re ready to roll, it’ll just need a quick reheat. pro tip: always chop your veggies ahead of time; they can chill in the fridge, ready to jump into your sushi whenever you are!
Flavor Enhancement Tips
Don’t skimp on the rice vinegar recipes ! a little bit of vinegar mixed with sugar and even a hint of low sodium soy sauce helps elevate your sushi rice to a whole new level.
Try adding in some sesame oil for an extra depth of flavor, and watch your taste buds dance.
Perfect Presentation: Making Your Sushi Look as Amazing as It Tastes
Honestly, the look of sushi is half the fun! It’s all about that sushi aesthetic . Here’s how to take your rolls from scrumptious to sensational:
Plating Techniques
When serving your sushi, slice it into even pieces—trust me, no one loves biting into a big, messy roll. a clean cut shows you mean business.
Arrange them neatly on a plate, but don’t just throw them on there—consider some diagonal or circular patterns to make it pop.
Garnish Ideas
You know what always looks fancy? a sprinkle of sesame seeds or slices of pickled ginger on top. they add visual appeal and flavor! if you’re feeling adventurous, some thinly sliced green onions can also give your plate that wow factor .
Color Combinations
The colors of your sushi fillings will shine if you mix and match. think deep greens from avocado, bright oranges from carrots, and oh-so-appealing pinks from fish.
It’s like a rainbow on a plate!
Storage & Make-Ahead: Keeping Your Sushi Fresh
So you’ve made a batch of awesome sushi rolls, but are wondering how to keep ‘em fresh. Here’s what I’ve experienced:
Storage Guidelines
Always store sushi rolls in an airtight container . This keeps your sushi from drying out. And if you have leftover sushi rice, keep that too!
Reheating Instructions
Sushi is best eaten fresh, but if you’ve got leftovers, take your rice out and give it a quick zap in the microwave for about 30 seconds .
Just make sure to drizzle a bit of water over it beforehand to keep it from getting crusty.
Creative Variations: Thinking Outside the Sushi Box
Now, let’s talk about having fun with your sushi roll recipes . The beauty of sushi is its flexibility.
Flavor Adaptations
Feeling spicy? try adding a little sriracha to your avocado; it’ll rock your world! or swap regular fish options for plant-based sushi options like marinated tofu or even sweet potato.
The possibilities are endless!
Seasonal Twists
I love incorporating seasonal ingredients—like fresh berries in summer or roasted root veggies in fall—into my sushi. They add a specific twist that keeps things fresh and exciting.
Complete Nutrition Guide: Here’s the Scoop
I always love knowing what I’m munching on. Each roll can be tailored like a blank canvas!
- Calories: Around 210 per roll
- Protein: About 10g
- Sodium: A mere 50mg when using low sodium soy sauce—perfect for those on a low sodium diet journey!
Expert FAQ Solutions: Your Burning Questions Answered
I get tons of questions when it comes to making sushi. Things like, “Why did my sushi fall apart?” or “What’s the best way to store sushi?” My answer? Practice! Don’t sweat it if your first rolls aren’t perfect; just keep rolling, literally!
Encouragement: Get Out There and Roll!
So, whether you’re looking for simple sushi recipes or diving into more complex japanese cuisine recipes , making your own sushi at home is totally doable.
Embrace the mess, savor the learning experience, and remember the joy of creating something delicious from scratch. grab your nori, prep those fresh sushi ingredients , and get rolling! you’ve got this!
Savor the Sea: Low Sodium Sushi Rolls Card
⚖️ Ingredients:
- 2 cups sushi rice (400g)
- 2 tablespoons rice vinegar (30ml)
- 1 tablespoon sugar (12g)
- 1 teaspoon salt (or low sodium salt alternative, optional)
- 1 medium cucumber, julienned
- 1 medium carrot, julienned
- 1 ripe avocado, sliced
- 4 oz (115g) fresh fish (e.g., tuna or salmon) or tofu, thinly sliced
- 4 sheets nori (seaweed)
- Low sodium soy sauce or tamari for dipping (optional)
- Sesame seeds (optional)
- Pickled ginger (optional)
🥄 Instructions:
- Step 1: Rinse sushi rice under cold water until water runs clear.
- Step 2: Cook rice using a rice cooker or pot according to package instructions.
- Step 3: Once cooked, let sit covered for 10 minutes.
- Step 4: Combine rice vinegar, sugar, and salt in a small bowl. Microwave for 30 seconds until dissolved; mix into the rice.
- Step 5: Spread the seasoned rice on a large plate and let cool for about 20 minutes.
- Step 6: Julienne cucumber and carrot; slice avocado and fish or tofu.
- Step 7: Place a sheet of nori on the sushi mat, shiny side down.
- Step 8: Wet hands and grab a handful of sushi rice, spreading it evenly over nori, leaving the top 1-inch clear.
- Step 9: Layer the filling ingredients in the center.
- Step 10: Roll gently but firmly, using the bamboo mat to guide the nori.
- Step 11: Use a sharp knife to slice rolls into 6-8 pieces.
- Step 12: Serve with low sodium soy sauce and garnishes.
Previous Recipe: How to Bake My Grandmother's Lemon Cakes Great Gatsby Recipe
Next Recipe: How to Make Mollejas a la Madrileña: My Crispy, Delicious Secret