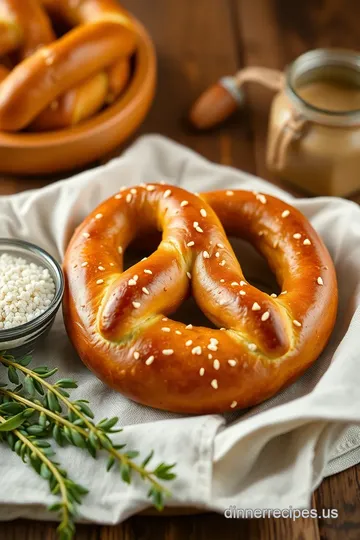
Boiled Soft Pretzels - Chewy & Delicious
Craving something unique? Discover my grandmother's secret for making boiled soft pretzels that are irresistibly chewy & delicious! Perfect for any occasion.

- Recipe Overview
- Key Benefits
- Essential Ingredients Guide for Boiled Soft Pretzels - Chewy & Delicious
- Crafting the Perfect Pretzel: The Professional Cooking Method
- Pro Tips & Secrets for Boiled Soft Pretzels - Chewy & Delicious
- Perfect Presentation: The Art of Plating
- Storage & Make-Ahead: Keep the Soft Pretzel Magic Alive
- Creative Variations: Because Pretzels Can Be Anything!
- Complete Nutrition Guide: Know What You’re Munching
- Expert FAQ Solutions: Your Questions Answered
- Recipe Card
Have you ever been to a german beer garden? you know, the kind where the air is filled with laughter, the smell of sizzling sausages wafts through the air, and those golden brown soft pretzels are just begging to be devoured? oh my gosh, right? when i first tried one, i was blown away by that chewy, salty goodness.
From that moment, i knew i had to learn how to make them myself. and let me tell you — it’s not as tough as you might think.
This recipe for boiled soft pretzels - chewy & delicious will have you feeling like a pro faster than you can say “wunderbar!”
So, have you ever tried making homemade pretzels ? There’s something magical about the process. The scent of warm yeast, the satisfaction of kneading chewy pretzel dough , and the thrill of baking them until they’re perfectly golden brown — it’s an experience that’s both rewarding and, let’s be honest, pretty darn fun!
Recipe Overview
Now, let’s take a little trip down memory lane. the origin of pretzels can be traced back to germany, where they are a staple at festivals.
You'd often see them sold at street fairs, and they go perfectly with a cold beer. nowadays, these soft delights have become a popular snack recipe right in our kitchens, thanks to their easy preparation and outstanding flavors.
The process of making these freshly baked pretzels is straightforward but requires a little patience. you’ll need about 1 hour from start to finish, including the time for the dough to rise.
While this isn’t a “quick pretzel recipe,” i promise you the result is totally worth it. plus, it yields about 8 pretzels , so you’ve got plenty to share at your next dinner party or casual movie night.
The cost? not much, really. most of the ingredients are pantry staples. flour, yeast, water — you probably have everything already.
So say goodbye to those pricey store-bought options and hello to your own artisan pretzel recipe .
Key Benefits
Let’s talk benefits, shall we? first off, these soft pretzels are not just delicious; they’re surprisingly good for you! when you make them at home, you control the ingredients, so you can skip preservatives.
They’re rich in carbs, making them a fun energy kick after a long day.
What i love about these melted-delicious snacks is their versatility. friends come over? toss some melted cheese next to your pretzels for a killer pretzel dip idea .
Hosting a festival-themed night? shape them into little knots or loops, and try out your favorite toppings like garlic powder or cheddar cheese .
Yes, please!
And let's not forget about their impressive charm during special occasions. i mean, can you imagine serving up a platter of warm pretzel bites during game day? it’s the ultimate snack to satisfy any crowd.
Flavors can range from sweet and savory pretzels , giving you the option for something unique every time — trust me, nobody will be turning these down!
So now that you're all hyped up about making the tastiest soft pretzel recipe , let's dive into the ingredients and get this pretzel party started.
You'll be impressing friends and family in no time!
Essential Ingredients Guide for Boiled Soft Pretzels - Chewy & Delicious
Making the perfect boiled soft pretzels - chewy & delicious is all about having the right ingredients and tools on hand.
It’s like putting the right players on a field—you want them all working together for that winning flavor! let’s break it down so that you can whip up these yummy pretzels at home.
Premium Core Components
First off, let’s chat about your ingredients . You’ll want to use high-quality options to get that classic pretzel taste. Here’s what you’ll need:
- All-purpose flour: 4 cups (500g)—it gives the dough that lovely chewy texture.
- Active dry yeast: 1 packet (2 ¼ tsp or 7g)—don’t skimp on this, it’s what makes those pretzels rise!
- Warm water: 1 ½ cups ( 110° F, 43° C) (360ml)—not too hot, not too cold—think of it like Goldilocks!
- Granulated sugar: 2 tablespoons (25g)—this little bit of sweetness balances out the salt.
- Salt: 2 teaspoons (12g)—essential for flavor!
- Melted butter: 2 tablespoons (30g)—because buttery pretzels are just right.
Storage tip: Keep your flour in a cool, dry place. It’s best used within six months once opened. And remember to check your yeast—make sure it’s not expired; otherwise, your dough won’t rise, and that’s just a sad day in pretzel land!
Signature Seasoning Blend
Now, let’s talk about what gives those soft pretzels that amazing flavor. you can get creative with your seasoning blend .
The classic salt topping is a must, but why not spice things up a bit?
- Coarse sea salt: Essential for sprinkling on top before baking.
- Herbs like rosemary or oregano: Just mix them into the dough for a gourmet twist.
- Garlic powder or cheese: Add some shredded cheese to the dough for an ooey-gooey goodness.
Smart Substitutions
Sometimes life throws us curveballs, and that’s okay! Here are some common alternatives you can use:
- Flour: Whole wheat if you want some extra fiber.
- Yeast: Instant yeast works like a charm—no need to activate, just toss it in!
- Dairy-free butter: If you're looking for a vegan option, this sub works great.
If you ever find yourself short on ingredients, don’t stress; improvisation is the name of the game!
Kitchen Equipment Essentials
Now, let’s chat about some must-have tools in your kitchen for pretzel-making:
- Mixing bowls: You can’t go wrong with some good-sized bowls for mixing your dough.
- Stand mixer: Or a trusty spoon and some elbow grease. You do you!
- Large pot: You’ll need this for boiling your pretzels.
- Slotted spoon: This is how you’ll retrieve those beauties from the boiling water.
- Baking sheet lined with parchment paper: Nobody wants a sticky pretzel day!
Some Personal Tips
Making pretzels is all about the experience, right? i remember my first time kneading dough—i thought i was going to wrestle with it forever! here’s a little heartbreak sage: don’t rush the rising.
That’s where the magic happens! if you let it rise for about 30- 40 minutes, you’ll get that perfect fluffy texture.
Kneading tips? keep your surface lightly floured and really work that dough until it’s smooth and elastic, like it’s doing yoga!
Wrapping Up
So, whether you're whipping up an easy pretzel recipe for a movie night or going all out for a dinner party with some pretzel dip ideas , having the right ingredients, substitutes, and equipment makes all the difference in the world.
When you get down to it, making your own homemade pretzels can be so rewarding. just imagine pulling out some golden-brown pretzels and hearing that sweet “wow” from your hungry friends!
Alright, ready for the fun part? Let’s dive into the step-by-step instructions for creating these delicious boiled soft pretzels ! Trust me, you’ll want to keep this recipe close—after all, who can resist that warm, chewy goodness?
Crafting the Perfect Pretzel: The Professional Cooking Method
Oh my gosh, if you think about a snack that screams "festive fun," it's gotta be the boiled soft pretzels - chewy & delicious ! seriously, these babies are irresistible.
You might wonder how the pros do it, so let me take you through the essential steps in a super chill way.
Just imagine we’re back at the kitchen counter together, sharing tips like best friends.
Essential Preparation Steps
First things first, let’s get our mise en place on lock. it’s just a fancy way to say have everything ready to go before you start cooking.
Measure out your ingredients—like those 4 cups of flour and 10 cups of water—so you’re not scrambling at the last minute.
It makes a world of difference.
Next up, let's chat time management . have you ever been halfway through a recipe and realized you forgot to preheat the oven? ugh! avoid that by setting a timer for each step—like your dough rising time of about 30- 40 minutes .
Seriously, just whip out your phone or use a kitchen timer.
Organization is crucial too. keep your workstation tidy . it’s no fun dealing with a cluttered counter when you’re trying to roll out that chewy pretzel dough .
And let’s not forget about safety —be careful around the boiling water ; burns are no joke, my friends.
Step-by-Step Process
Alright, let’s dive into the fun part—making those pretzels! Here’s how you can crush it at home:
- Activate the Yeast : Start by mixing 1 ½ cups of warm water (at about 110° F, people!) with 2 tablespoons of sugar. Toss in your yeast and let it foam up for 5 minutes . It’s like magic!
- Mix the Dough : In a bowl, combine your flour and 2 teaspoons of salt. Pour in that yeast mixture and 2 tablespoons of melted butter . Mix until you have dough, then knead for about 5- 7 minutes .
- First Rise : Cover it with a towel and let it sit in a warm place. We want that dough to double in size—key for soft pretzel goodness.
- Prepare for Boiling : Bring 10 cups of water and ⅔ cup of baking soda to a gentle boil. It’s crucial for that delicious crust!
- Shape the Pretzels : Divide the dough and roll each piece into a long rope. Twist it into your adorable pretzel shape. Don’t worry, they don’t have to be perfect—just charming!
- Boil the Pretzels : Place each pretzel in the boiling water for about 30 seconds per side . This little dance gives them that gorgeous texture.
- Bake : Pop them on a parchment-lined baking sheet, sprinkle with coarse salt, and bake in a preheated oven at 450° F ( 232° C) for 10- 12 minutes . Watch for that dreamy golden brown color!
- Cool and Serve : Let them cool slightly, brush with butter if you want that extra flair, and then dive in!
Expert Techniques
These pretzels aren’t just about following steps. It’s all about the artisanal techniques . Here’s the inside scoop:
- Kneading dough tips : Get your hands in there and really work the dough until it’s smooth and elastic. It's a workout but it’s worth it!
- Timing precision : Stick to those boiling times. Overboiling can lead to tough pretzels—no one wants that!
- Quality checkpoints : When they come out of the oven, you want to see a light golden hue. This means you hit the sweet spot!
Success Strategies
Let’s avoid some common pitfalls, shall we?
- Don’t rush the rising : Your dough loves to relax, so give it the time it needs.
- Quality assurance : Before baking, make sure each pretzel is nice and puffy. They’ll only puff up more in the oven!
- Make-ahead options : If you’re prepping for a party, you can shape and boil them earlier—just bake when you’re ready to serve.
Alright, my fellow foodies, you now have what it takes to whip up a batch of those homemade pretzels that’ll impress just about anyone! whether you’re snacking during a movie or serving them at a dinner party, these pretzels are bound to be a hit.
And speaking of making waves in the kitchen, let’s transition to some additional information on pretzel variations and serving suggestions!
Pro Tips & Secrets for Boiled Soft Pretzels - Chewy & Delicious
Alright, friends, let’s dive into the world of boiled soft pretzels - chewy & delicious ! making soft pretzels is like embracing a cozy hug wrapped in warm dough.
Want to nail that perfect batch? here are some pro tips and tricks i’ve picked up on my pretzel-making journey.
Chef's Personal Insights
The key to fluffy, chewy pretzels is definitely in the yeast dough . i once baked a batch that didn't rise properly and let’s just say, they were more like hockey pucks than pretzels.
So trust me, let the yeast brew!
Time-saving Techniques
Your kitchen bestie tip: when the dough is rising, use that time wisely! pre-measure your toppings or whip up a quick mustard dipping sauce for pretzels .
That way, when the pretzels are out of the oven, you’re ready to munch!
Flavor Enhancement Tips
Love cheesy pretzels ? toss some shredded cheese into the dough while mixing. want to elevate those flavors? consider adding spices— garlic powder or smoked paprika can really elevate those classic pretzel flavors.
Presentation Advice
Here’s the scoop on making those pretzels look as good as they taste. aim for a nice golden brown color when baking—everything is better when it looks fancy! a sprinkle of coarse salt on top doesn’t just add flavor; it adds that wow factor.
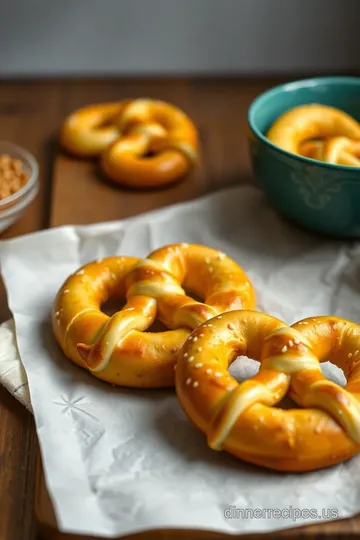
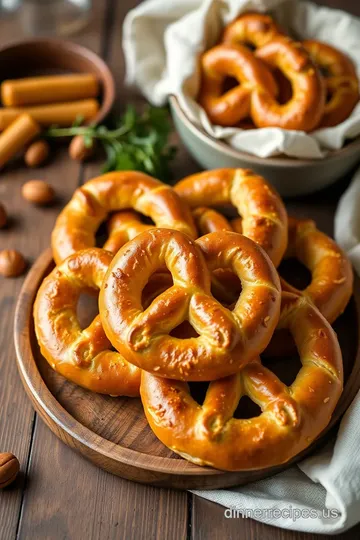
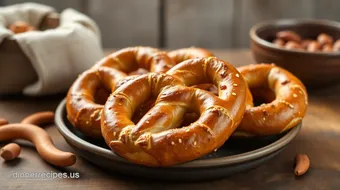
Perfect Presentation: The Art of Plating
Ever noticed how some snacks just look more delicious than others? Presentation can be your secret weapon!
Plating Techniques
After baking, let your freshly baked pretzels rest a bit. then, arrange them on a bright plate for visual impact.
I like to make a fun spiral with my pretzels, or just stack 'em up!
Garnish Ideas
Why not sprinkle some parsley or chives around the plate? this adds a nice pop of color and freshness. pair them with different sauces for dips—maybe cheese on one side and mustard on the other.
Color Combinations
Use colors to grab attention! The warm brown of the pretzel, combined with a bright yellow mustard and vibrant greens, is totally eye-catching. It’s like a little snack rainbow!
Storage & Make-Ahead: Keep the Soft Pretzel Magic Alive
We all love a good snack recipe, but let's be real—sometimes you want to enjoy pretzels without the fuss.
Storage Guidelines
Once your pretzels are baked and cooled, seal them in a zip-top bag or airtight container. They’ll last a couple of days, but let's be honest—good luck keeping them around that long!
Preservation Methods
If you’re gonna be smart about it, you can freeze them! Just pop them in the freezer after they’ve cooled, and they’ll last up to 3 months !
Reheating Instructions
When you're ready to devour them again, just pop those pretzels in the oven at 350° F until warmed through. A quick spray of water helps keep them soft.
Freshness Duration
For the best flavor and texture, I’d recommend devouring them within 2-3 days if not frozen. After that, they may lose a bit of that chewy magic.
Creative Variations: Because Pretzels Can Be Anything!
Bored of the same ol' snack? Here’s where it gets fun! Pretzels can easily be tailored to your taste.
Flavor Adaptations
Think outside the box: try buffalo ranch pretzels or even sweet pretzel bites rolled in cinnamon sugar. Yum!
Dietary Modifications
Want to make a gluten-free version? Use a gluten-free flour mix. You can even try making vegan pretzels by swapping the butter with olive oil.
Seasonal Twists
During the fall, you can add pumpkin spice to the dough for a festive twist!
Regional Variations
Go full-on German by topping with caraway seeds or trying cheese-filled pretzels for a hearty treat!
Complete Nutrition Guide: Know What You’re Munching
Let’s chat about what these bad boys are packing:
Detailed Breakdown
A classic pretzel will give you about 180 calories per serving. Not too shabby, right?
Health Benefits
Plus, they hold some fiber and protein to keep you satisfied. Always good when you’ve got that craving!
Dietary Considerations
As with anything—balance is key. While they’re delicious, don’t forget about the importance of those greens on your plate.
Portion Guidance
Remember, moderation is your friend! About 1-2 pretzels as a snack with all your favorite dips is just perfect.
Expert FAQ Solutions: Your Questions Answered
You might have a couple of questions as you dive into your pretzel-making adventure.
Common Questions
“Why did my pretzels turn out soggy?” It might have been too long in the boil. Make that sweet spot about 30 seconds each side.
Troubleshooting Guide
Got dough that won’t rise? Make sure your yeast is fresh—there’s nothing worse than working with expired ingredients.
Success Tips
Use kitchen towels to cover your dough during the rise. It keeps everything warm and cozy.
Variations Explained
If you want twisted pretzel shapes, just roll the dough thinner. Want thick ones? Keep it chunky!
So, are you ready to embrace that homemade pretzel journey? i promise, each bite of your boiled soft pretzels - chewy & delicious will transport you straight to a street festival and make you want to share them with everyone you know.
Go on—let’s knead that dough together and make some magic! These pretzels are the perfect go-to snack, whether it’s game day, a dinner party, or just because you deserve it. Happy baking!
Boiled Soft Pretzels - Chewy & Delicious Card
⚖️ Ingredients:
- 4 cups all-purpose flour
- 1 packet active dry yeast
- 1 ½ cups warm water
- 2 tablespoons granulated sugar
- 2 teaspoons salt
- 2 tablespoons unsalted butter, melted
- 10 cups water (for boiling)
- ⅔ cup baking soda
- Coarse sea salt for sprinkling
- Optional: melted butter for brushing after baking
🥄 Instructions:
- Step 1: In a small bowl, combine warm water and sugar. Sprinkle yeast over water; let sit for 5 minutes until foamy.
- Step 2: In a large bowl or stand mixer, combine flour and salt. Add melted butter and yeast mixture. Mix on low until dough forms.
- Step 3: Knead for about 5-7 minutes until smooth and elastic.
- Step 4: Place the dough in a greased bowl, cover with a towel or plastic wrap, and let rise in a warm place for 30-40 minutes or until doubled in size.
- Step 5: In a large pot, bring water and baking soda to a gentle boil.
- Step 6: Punch down the risen dough, divide into 8 equal pieces. Roll each piece into a long rope (about 24 inches), twist into a pretzel shape.
- Step 7: Carefully place each pretzel into the boiling water solution, boiling for about 30 seconds on each side. Remove with a slotted spoon and place on a parchment-lined baking sheet.
- Step 8: Sprinkle with coarse sea salt. Bake in a preheated oven at 450°F for 10-12 minutes or until golden brown.
- Step 9: Allow pretzels to cool slightly before serving. Brush with butter if desired.
Previous Recipe: How to Bake Pumpkin Pie with Creamy Spices: A Cozy Holiday Favorite
Next Recipe: Ultimate Roasted Chicken Garlic Herb Potatoes: A Sunday Comfort Dish