Deliciously Baked Philadelphia Cheesecake Bars
Satisfy your sweet tooth with my easy Bake Philadelphia Cheesecake Bars Deliciously! Creamy, rich, and perfect for gatherings—check out my tips inside!

- look into Into Delicious Desserts: The Story of Philadelphia Cheesecake Bars
- Essential Ingredients Guide for Baking Philadelphia Cheesecake Bars Deliciously
- Unlock the Joy of Baking: Professional Cooking Method for Cheesecake Bars
- Pro Tips & Secrets: Elevating Your Cheesecake Bars
- Perfect Presentation: Let’s Make It Look as Good as It Tastes
- Storage & Make-Ahead: Keep it Fresh
- Creative Variations: Make It Your Own
- Complete Nutrition Guide: Staying Informed
- Conclusion: look into into Dessert Bliss
- Frequently Asked Questions
- Recipe Card
look into Into Delicious Desserts: The Story of Philadelphia Cheesecake Bars
Hey there, friend! picture this: it’s a sunny afternoon, and the sweet aroma of philadelphia cream cheese desserts wafts through your kitchen.
You’ve had a rough week, and you're craving something rich and creamy. you know the answer? bake philadelphia cheesecake bars deliciously ! these treats are like a hug for your taste buds.
Honestly, every bite is an indulgence that makes everything feel just a little better.
Let’s go back in time for a hot second. cheesecake’s roots trace all the way back to ancient greece, where they served it to athletes during the first olympic games.
Fast forward to now, and cheesecake is a superstar on dessert menus everywhere. however, these cheesecake bars take that classic idea and make it portable and party-ready! who doesn’t love a sweet dessert that you can easily pack up for gatherings or just enjoy on the couch while binge-watching your favorite show?
What Makes These Cheesecake Bars Special
Now you might be wondering, “how hard can it be to whip up some easy cheesecake bars recipes ?” trust me; it’s not! this recipe is easy-peasy, and you won’t need any fancy equipment.
In about 70 minutes , you’ll have a pan of scrumptious bars ready to chill in the fridge. this recipe serves 16 bars , perfect for sharing (or not!).
Plus, what could be better than a dessert that feels so satisfying but doesn’t break the bank? seriously, you can make this for a handful of bucks!
Benefits You’ll Love
Let’s talk benefits! first up, these bars are made with rich cream cheese and eggs, making them a source of protein and calcium.
While they’re definitely a treat, you can – in good conscience – say they carry a few nutritional perks along with their deliciousness.
Pair that with a buttery graham cracker crust recipe that satisfies your sweet tooth, and you’ve got yourself a winner!
These bars are truly party-friendly desserts . whether it’s a birthday bash, holiday gathering, or simply a weekend potluck, they’re sure to shine on the dessert table.
They’re neatly sliced, easy to serve, and visually appealing. plus, you can customize them with a variety of toppings like fresh fruit, or drizzles of chocolate — the possibilities are endless!
Okay, think about this: what’s better than taking a bite of smooth cheesecake filling topped with strawberries? not much, if you ask me.
Open to new ideas? try serving them with a cup of coffee for that perfect dessert pairing experience!
Transition to Flavor City
Alright, let’s get cooking, folks! grab your apron because you're about to whip up some amazing homemade cheesecake bars that’ll impress everyone.
But before you do, let’s dive into the ingredient list that’ll make these bars so creamy and dreamy. don’t worry, i’ll be right here to guide you through those delightful cheesecake bar cooking instructions ! you won’t want to miss this.
Ready to roll? Let’s gather those ingredients and get started! 🍰
Essential Ingredients Guide for Baking Philadelphia Cheesecake Bars Deliciously
You know, nothing says “i love you” like a creamy slice of cheesecake, right? but let’s keep it real—if you want to bake philadelphia cheesecake bars deliciously , you gotta start with the right ingredients and tools.
Here’s your no-nonsense guide to get everything going smoothly.
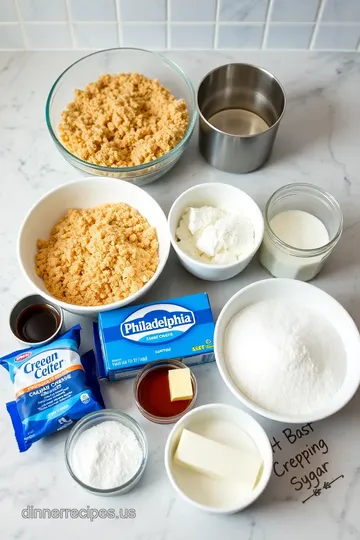
Premium Core Components
First off, let’s break down the premium core components you’ll need. for your crust, you’re gonna want 1 ½ cups of graham cracker crumbs (that’s about 150g), ⅓ cup of granulated sugar (70g), and ½ cup of melted butter (113g).
This trio is the foundation of your cheesecake bars.
When it comes to your filling, the star of the show is 4 packages of philadelphia cream cheese (8 oz each).
We’re talking about 900g of creamy goodness right here. add 1 cup of sugar (200g), 4 large eggs , 1 cup of sour cream , and just a tablespoon of flour.
Quality indicators? look for cream cheese that’s smooth and spreadable. check the date on the sour cream; nothing worse than sour sour cream.
Storage guidelines? keep that cream cheese in the fridge and use it within a month. and for the crust, if you’ve got leftover graham cracker crumbs, seal them tight.
They can last quite a while!
Signature Seasoning Blend
Now, onto the signature seasoning blend . in this case, it’s really about the vanilla extract—don’t skimp on it! a teaspoon in your filling elevates the entire flavor.
You could throw in some lemon zest if you’re feeling zest-y.
Want to mix it up? try adding a pinch of salt; it brings out those yummy sweet notes. depending on your taste, you could even introduce some light flavors like nutmeg or cinnamon to jazz things up.
Smart Substitutions
Sometimes life throws you curveballs, and you might need some smart substitutions . left your eggs at the store? use unsweetened applesauce as a replacement—1/4 cup for each egg can do the trick.
Need a lighter option? swap sour cream for greek yogurt —it’s a game-changer and keeps that creamy texture!
If you only have vanilla yogurt , that could bridge the gap too! and let’s not forget those moments when you're out of graham crackers; digestive biscuits or crushed vanilla wafers work in a pinch.
Flexibility is key!
Kitchen Equipment Essentials
What about those kitchen equipment essentials ? honestly, you can’t go wrong with a good mixing bowl and an electric mixer.
You’ll be blending that cream cheese like a boss! a 9x13 inch baking pan is your soulmate for this recipe.
If you’re feeling fancy, line it with parchment paper—it’s a lifesaver for easy removal.
Oh, and a rubber spatula is your best friend for scraping down the sides of the bowl to get every last drop of that silky filling.
Don’t forget a pretty knife for slicing your finished bars into those perfect squares!
Tips & Tricks for Success
When you’re diving into this creamy goodness, keep a few baking tips in your back pocket. make sure your cream cheese is softened —like, room temperature soft.
Trust me, this minimizes lumps and creates that smooth cheesecake filling you crave.
Don’t overmix after adding the eggs. Just blend until incorporated or you might end up with cheesecake bars that crack faster than a dozen cookies in a school lunch!
Let your cheesecake cool down at room temp before you toss it in the fridge, and for the ultimate treat, serve it with fresh berries or whipped cream on top.
Who doesn’t love a bit of flair, right?
So, now that we’ve got all the ins and outs of your ingredients and equipment, you’re ready to whip up those mouthwatering philadelphia cheesecake bars ! stick around for the cooking instructions coming right up.
Trust me, once you sink your teeth into these delicious dessert bars , you’ll be the star of your next gathering!
Unlock the Joy of Baking: Professional Cooking Method for Cheesecake Bars
Oh my gosh, if you love cheesecake like i do, then you’re in for a treat! today, we’re diving into the professional cooking method behind the deliciously baked philadelphia cheesecake bars .
Trust me, mastering this recipe will elevate your dessert game and impress your friends and family. let’s get cracking!
Essential Preparation Steps
Before we even think about mixing ingredients, we need to get our act together. ever heard of mise en place ? it’s all about having everything ready.
So, gather your ingredients like philadelphia cream cheese, sugar, and graham crackers . i promise, it’s like having a head start in a race.
Time management tips ? easy-peasy! set a timer when you put things in the oven. for this cheesecake, preheat your oven to 325° f ( 163° c) .
That way, when you’re ready to bake, you won’t be waiting around.
Organization is key. make sure your counter is clean and your baking pan is lined. seriously, nothing’s worse than scrambling around looking for a spatula! and safety considerations… always, always watch your hands around that oven.
Trust me, i’ve learned the hard way.
Step-by-Step Process
Now that you’re all set, let's jump into the real deal.
-
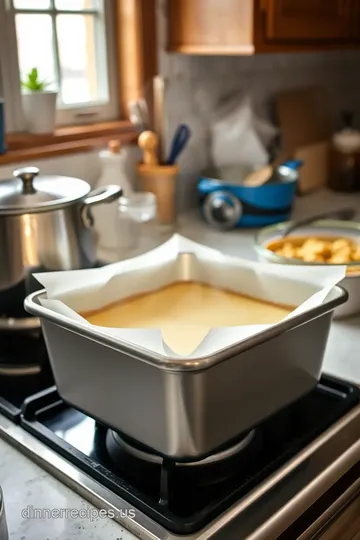
Prepare the Baking Pan: First, you want to line your 9x13 inch baking pan with parchment paper or just grease it well.
-
Make the crust: mix 1 ½ cups of graham cracker crumbs , ⅓ cup of sugar , and ½ cup of melted butter .
Press this into the pan, and get it nice and even.
-
Pre-bake the Crust: Bake it in your preheated oven for 10 minutes . This gives it that perfect texture!
-
Prepare the filling: beat 4 packages of softened philadelphia cream cheese until it’s smooth. whip in 1 cup of sugar and 1 teaspoon of vanilla extract .
Add in 4 eggs one at a time, mixing after each. the key here is to keep it smooth—don’t over-mix, or you’ll end up with cracks in your cheesecake bars.
-
Assemble and Bake: Pour that dreamy filling over the cooled crust. Bake for 25 minutes . You want the center to be set but slightly jiggly—an essential visual cue for doneness.
-
Cool and Chill: Let it cool at room temperature, then refrigerate for at least 2 hours . This makes slicing it into bars a breeze.
Expert Techniques
Okay, let’s get pro tips here. A smooth cheesecake filling is crucial. No lumps! And check for quality. If your ingredient isn’t fresh, your bars won’t taste as good.
Quality checkpoints ? make sure your butter is melted, and your cream cheese is at room temperature. if things are too cold or hot, it could throw off the balance.
If you find your cheesecake cracking—don’t freak out! just cover it with toppings, and nobody will ever know.
Success Strategies
Now, let's avoid some common mistakes. Don’t skip the chilling step! Trust me, it matters. Who wants a gooey mess? No one!
Quality assurance tips ? Always taste your filling before baking. And remember, pairing your bars with fruits or whipped cream makes for party-friendly desserts .
If you know you have a busy week, make these bars ahead of time. they keep well in the fridge and can replace your usual sweet treat cravings.
Seriously, you can’t go wrong!
Final Thoughts
So there you have it! a foolproof way to bake philadelphia cheesecake bars deliciously . whether you’re whipping them up for a gathering or just for a cozy night in, these classics never disappoint.
You’re going to want to share these luscious treats, topped with fresh fruit or a drizzle of chocolate.
Now that you’re all set to impress your guests, keep reading for some additional information that can take your baking journey even further.
Trust me, once you master these bars, you’ll be inspired to try tons of other easy cheesecake desserts and you’ll never look back! happy baking, my friend!
Pro Tips & Secrets: Elevating Your Cheesecake Bars
Hey there, dessert lovers! If you’re ready to bake Philadelphia cheesecake bars deliciously , let's dive into some pro tips that will take your dessert from good to absolutely mouthwateringly great .
First off, remember to soften your philadelphia cream cheese before starting. that’s a game-changer! just pull it out of the fridge and let it chill on the counter for about 30 minutes.
When you mix it, you’ll get that smooth cheesecake filling with zero lumps. we’re aiming for perfection here.
Now, if you’re pressed for time, try this time-saving trick: crank up your oven and get things preheating while you prepare the crust.
That way, your bars will be in and out of the oven in no time, leaving you plenty of moments to enjoy with family or friends.
When it comes to flavor, don't skimp on the vanilla. a single teaspoon might sound like a little, but it works wonders.
And keep an eye on your baking time— a slight jiggle in the center while it's still warm is your friend.
It means the filling is creamy and luscious, just the way we want it.
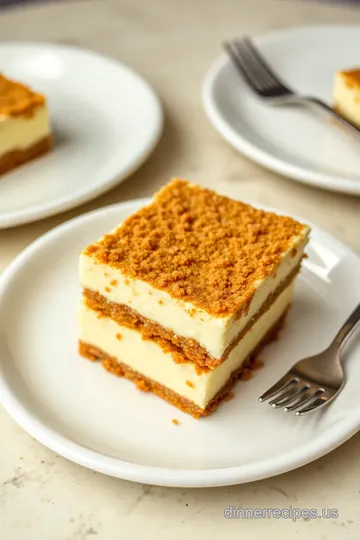
Perfect Presentation: Let’s Make It Look as Good as It Tastes
Okay, so you’ve got your bars baked and cooled—it’s showtime! Plating your cheesecake bars elegantly can be the difference between “Oh, this looks nice” and “Wow, where’d you get these?”
Start with a simple plate, but don't just throw those bars on there! slice them into neat squares and angle them slightly for a dynamic look.
Adding a flourish of whipped cream or a sprinkle of graham cracker crumbs on the side can really up the visual appeal.
And you know what else is totally fabulous? a dollop of fruit topping! whether it’s fresh strawberries, blueberries, or some good ol’ warm berry compote, color combinations make your dish pop and add a sweet contrast to that rich and creamy cheesecake.
Storage & Make-Ahead: Keep it Fresh
Let’s be real—sometimes life’s got you running around like a headless chicken. these cheesecake bars? they’re totally forgiving. you can whip up a batch ahead of time and store them in the fridge.
Just make sure to cover them well to avoid any strange fridge smells. i usually use plastic wrap, but those cute little food storage containers work wonders too!
Now, if you’re wondering how long these beauties last, they’ll chill in the fridge for about 5-7 days before starting to lose that creamy goodness.
To reheat, just pop a slice in the microwave for about 10-15 seconds ; you'll feel like you're biting into a fresh slice every single time.
Creative Variations: Make It Your Own
The beauty of these cheesecake bars is their versatility—there’s a world of flavor possibilities to explore! feeling adventurous? try adding a bit of chocolate! swirl in some melted chocolate into your batter before baking for a decadent twist.
You could even go seasonal with a pumpkin cheesecake variation in autumn. just a cup of pureed pumpkin and a sprinkle of pumpkin pie spice will transform your bars into a cozy fall treat.
Oh my gosh , people will love you for it!
Wanna cater to dietary needs? Swap out that sour cream for Greek yogurt for a lighter option or use crushed gluten-free cookies for that crust.
Complete Nutrition Guide: Staying Informed
Now, before you dive in, let’s talk about nutrition. each bar has an estimated 250 calories , and you’re looking at about 15g of fat and 4g of protein .
These are rich and creamy treats, folks, but remember, a little goes a long way!
If you’re counting carbs or monitoring sugar intake, just keep portions in check. The beauty of dessert is enjoying it in moderation while still getting that satisfying sweet treat!
Conclusion: look into into Dessert Bliss
So there you have it, straight from my kitchen to yours! with just a few tips and tricks, you’re ready to bake philadelphia cheesecake bars deliciously .
They’re perfect for parties, family gatherings, or just a sweet night in with a little netflix. seriously, you’ll be the star of the show with these creamy delights!
Remember, cooking really is about experimenting and enjoying the process. So go ahead, unleash your creativity, and whip up these delicious dessert bars that everyone will love! Happy baking, my friends!
Frequently Asked Questions
How can I Bake Philadelphia Cheesecake Bars Deliciously without cracks?
To prevent cracks in your cheesecake bars, make sure you do not overmix your batter, especially after adding the eggs. Bake your cheesecake slowly at a lower temperature and allow it to cool gradually at room temperature before chilling it in the fridge.
Can I make these cheesecake bars ahead of time?
Absolutely! You can prepare and bake the cheesecake bars up to 2 days in advance. Just keep them stored in the refrigerator, covered tightly with plastic wrap or in an airtight container, to maintain their freshness and texture.
What’s the best way to serve Bake Philadelphia Cheesecake Bars Deliciously?
For the best presentation, serve your cheesecake bars chilled with a dollop of whipped cream and a sprinkle of fresh berries on top. They also pair wonderfully with coffee or tea, making them a perfect dessert for gatherings.
Can I freeze these cheesecake bars for later?
Yes, you can freeze the cheesecake bars! Cut them into individual portions, wrap them tightly in plastic wrap, and then place them in a freezer-safe bag. They can be stored in the freezer for up to 2 months; simply thaw in the refrigerator before serving.
What are some variations I can try with this cheesecake bar recipe?
You can customize your cheesecake bars in many ways! Consider adding a chocolate swirl by mixing in melted chocolate, or for a fruity twist, top them with a fruit compote after baking. For a seasonal option, swap some of the cream cheese for pumpkin and add spices.
Are there any nutritional considerations for Bake Philadelphia Cheesecake Bars Deliciously?
These cheesecake bars are rich in flavor but also high in calories and sugars. If you're looking for a lighter version, you can substitute Greek yogurt for sour cream and use alternative sweeteners like coconut sugar. Moderation is key, especially if you're watching your dietary intake.
Deliciously Baked Philadelphia Cheesecake Bars Card

⚖️ Ingredients:
- 1 ½ cups graham cracker crumbs
- ⅓ cup granulated sugar
- ½ cup unsalted butter, melted
- 4 packages Philadelphia cream cheese, softened
- 1 cup granulated sugar
- 1 teaspoon vanilla extract
- 4 large eggs
- 1 cup sour cream
- 1 tablespoon all-purpose flour
🥄 Instructions:
- Step 1: Preheat the oven to 325°F (163°C). Line the baking pan with parchment paper or grease it lightly.
- Step 2: In a mixing bowl, combine graham cracker crumbs, sugar, and melted butter. Press the mixture evenly into the bottom of the prepared pan.
- Step 3: Bake crust in preheated oven for 10 minutes; remove and let cool.
- Step 4: In a large bowl, beat softened cream cheese with an electric mixer until smooth. Gradually add sugar and vanilla, mixing until combined.
- Step 5: Add eggs one at a time, mixing well after each addition. Blend in sour cream and flour until smooth.
- Step 6: Pour the cream cheese filling over the cooled crust. Bake for an additional 25 minutes or until the center is set but slightly jiggly.
- Step 7: Remove from the oven and allow to cool at room temperature. Refrigerate for at least 2 hours before slicing into bars.
Previous Recipe: Quick Peanut Butter Cookies: My Family's Favorite Delightful Treats
Next Recipe: Deliciously Easy Bake Pumpkin Spice Cupcakes for Halloween