No-Knead Artisan Rustic Loaf: Effortless Bread Mastery
Craving homemade bread? Discover my go-to No-Knead Bread: Artisan, Rustic Loaf recipe that’s simple, mouthwatering, and always a hit. Try it today!

- The Joy of Homemade No-Knead Bread: Artisan, Rustic Loaf
- Recipe Overview
- Key Benefits
- Transition to Ingredients
- Essential Ingredients Guide
- Mastering the Art of No-Knead Bread: Artisan, Rustic Loaf
- Pro Tips & Secrets for Your No-Knead Bread: Artisan, Rustic Loaf
- Perfect Presentation
- Storage & Make-Ahead
- Creative Variations
- Complete Nutrition Guide
- Expert FAQ Solutions
- Conclusion: Bake with Confidence!
- Recipe Card
The Joy of Homemade No-Knead Bread: Artisan, Rustic Loaf
Opening Hook
Oh my gosh, let me tell you about the first time i tried making no-knead bread: artisan, rustic loaf . i had this sudden yearning for the smell of fresh bread wafting through my house—a craving that just wouldn't quit.
So, there i was, a novice baker with flour on my face, asking myself, "can i actually pull this off?" spoiler alert: i did! and let me tell ya, the result was straight-up magic.
The crust was golden, the crumb was airy, and i felt like a bread-making pro.
You know, there’s something incredibly comforting about baking bread yourself. it's not just that warm, chewy, crusty goodness; it's the whole experience—the waiting, the anticipation, and that first glorious bite.
Trust me, this easy homemade bread isn't just for the pros. if i can do it, you can too, with just a handful of ingredients and some simple baking techniques.
Recipe Overview
Let’s backtrack just a bit to where this deliciousness all began. the no-knead bread method started gaining traction in the late 2000s, thanks to a famous new york times recipe.
It took the world by storm, and for good reason! this artisan bread recipe revolutionized home baking, introducing busy folks to the glorious idea of minimal effort and maximum reward.
Today, rustic loaf preparation is all the rage in homes across america. it's so popular because it’s just so downright easy ! you’re looking at about 15 minutes of active prep, then a good 12 to 18 hours of resting—as in, you barely have to lift a finger, and you’ll end up with a masterpiece.
The best part? this bread is light on the wallet, yielding one beautiful loaf that could easily serve about eight people.
Key Benefits
Now, let’s talk benefits. first off, this homemade rustic bread is not just tasty; it’s nutritious too! with whole grains in the mix, you’re getting fiber and protein, and hey, you can even throw in some fresh herbs to jazz things up! plus, the natural fermentation process gives it that tangy flavor you can’t get from store-bought options.
What’s cool about this bread is how it fits any occasion. hosting a dinner party? serve it up with a nice hearty stew for a total crowd-pleaser.
Family game night? slather it with some butter and enjoy. it’s versatile enough to shine whether it’s a fancy meal or just a casual snack.
And let’s be honest, this is way better than any bread you could find in a supermarket. the texture? that wonderful chewy bread texture is unbeatable, and the crust? crispy as you could ever want.
Believe me, you may end up throwing your store-bought loaves out the window—don’t actually do that, but you might want to!
Transition to Ingredients
Before we dive into the actual baking process, let's gather our ingredients. i'll share everything you need to whip up this incredible no-knead bread: artisan, rustic loaf .
Just picture that lovely, crusty bread cooling on your counter, ready for your first slice. you just can’t beat that satisfaction, can you? stick with me, because i’ll guide you through every step of the way!
Ready? Let’s get those ingredients together, and before you know it, you’ll be pulling a warm, gooey loaf out of the oven that’s sure to impress!
Essential Ingredients Guide
When it comes to baking that no-knead bread: artisan, rustic loaf , you want to make sure you've got the premium core components down pat.
After all, bread baking isn't just a science – it's a cozy, heartfelt experience that brings people together. let's break it down!
Premium Core Components
Measurements are key
first things first: you can’t wing it when it comes to your ingredients. for our easy homemade bread, you’ll need 3 cups (360g) of all-purpose flour , 1½ teaspoons (8g) of sea salt , and ½ teaspoon (2g) of instant yeast .
For those in the metric world , that's about 360 ml of lukewarm water. get a good kitchen scale if you can; it's a total game-changer for precision!
Quality indicators
you’ll know you’ve got good flour if it feels soft and smells fresh, not musty. instant yeast should smell slightly yeasty – but if it smells like a gym sock, toss it.
And sea salt? give it a taste; it should be salty, not bitter or dull!
Storage guidelines
keep your flour in a cool, dry place in an airtight container. it’s good for about 6-12 months , but why wait? use it up! store your yeast in the fridge for longer life.
Just remember: freshness is everything in baking, and that includes the natural fermentation process for great flavor.
Signature Seasoning Blend
Now let’s spice things up. when crafting this rustic loaf, remember that a pinch of salt goes a long way.
It’s what brings flavor to your bread while helping with the texture . if you’re feeling adventurous, throw in some fresh herbs like rosemary or thyme to elevate your bread game.
It’s super simple baking techniques at play, folks!
Smart Substitutions
Cooking should be flexible, and bread baking shouldn’t feel restrictive! if you're out of flour or just want a variation, whole wheat flour can be a healthier choice.
For those avoiding gluten, give a gluten-free flour blend a shot. in a pinch? you could replace instant yeast with active dry yeast – just make sure to activate it first in warm water!
Kitchen Equipment Essentials
You don’t need a fancy bakery setup to nail this! a simple large mixing bowl , a wooden spoon , and a dutch oven will do the trick.
If you don’t have a dutch oven, any heavy pot with a lid that can handle hot temperatures will work! don’t forget parchment paper for easy cleanup.
Preparation tips
make sure your mixing bowl is large enough for the dough to rise. and please, resist the temptation to skip the resting times: the longer your dough sits, the better the flavor and texture.
It’s science, i promise!
Bread Baking Adventures
Baking this no-knead bread is pure joy! it’s like going back to the good old days, but without the fuss.
Picture yourself in your kitchen, flour on your face, the smell of crusty bread wafting through the house. sharing a slice of this artisan bread with family, maybe slathered in some butter or roasted garlic, is what good times are made of.
I’ve definitely had my share of bread flops, you know? Dough too wet or too dry, that’s a classic rookie mistake. But hey, we learn from our messy attempts!
Perfecting Your Loaf
When you're ready to actually bake, take time to really enjoy the baking process . and don't skimp on letting that bread rest after it comes out of the oven.
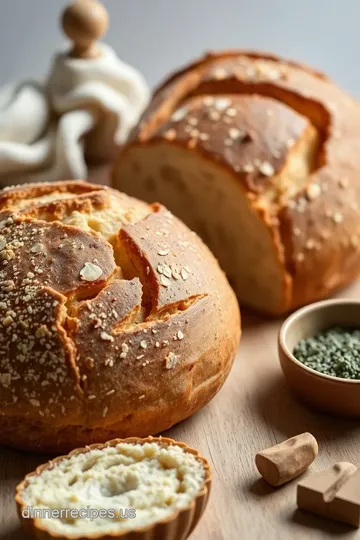
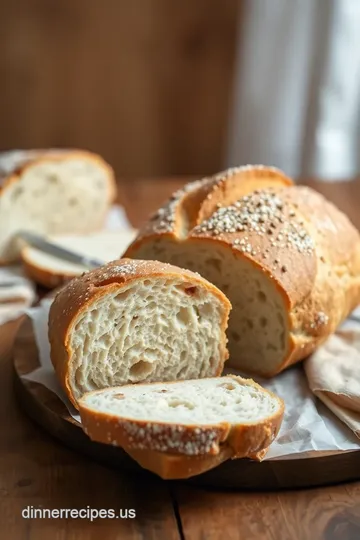
Getting that airy bread crumb and perfect crust takes time. just let it cool before slicing — otherwise, you'll have a gummy slice of disappointment.
Trust me: this journey of baking your homemade rustic bread is worth every minute. I can’t wait to see your bread budding proudly on a cooling rack! Up next, let's dive into the step-by-step instructions to make this heavenly loaf!
Mastering the Art of No-Knead Bread: Artisan, Rustic Loaf
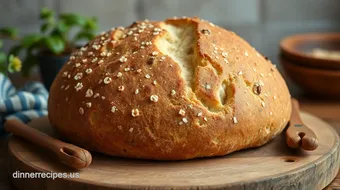
Oh my gosh, have you ever had that moment where you bite into a slice of bread and it's just pure magic? we're talking airy bread crumb , a golden crust, and just the right amount of chewiness! that’s the beauty of homemade artisan bread.
One of the best ways to ease into bread baking is through the no-knead bread method . let’s dive into how to master this rustic loaf without breaking a sweat.
Essential Preparation Steps
First things first, let’s chat about mise en place . this french term is all about getting your ingredients ready before you start.
You'll want to measure out 3 cups of all-purpose flour , 1 ½ teaspoons sea salt , ½ teaspoon instant yeast , and 1 ½ cups lukewarm water .
Having everything at your fingertips makes the process smooth and oh-so-much easier.
Make sure you have a clean kitchen space, too. set your area up, and keep your tools organized. it doesn't have to be perfect, but a tidy space makes it easier to whip up some delicious bread.
Time management is crucial. you’ve got to allow for that 12- 18 hours of resting time . i know, it seems like a long wait, but this is where the magic happens.
During this time, the dough ferments, and the flavor deepens. just think about it—it’s almost like free flavor development!
Safety is key when you’re baking, especially when you start using the oven. make sure your dutch oven can handle the high temp, and always use oven mitts to avoid any mishaps.
We don’t want any burnt hands!
Step-by-Step Process
-
Combine Dry Ingredients : First, in a large mixing bowl, whisk together your flour, salt, and yeast. Easy peasy!
-
Add Water : Gradually pour in that lukewarm water. Mix it until you get a shaggy dough. It should feel a little tacky but not so wet that it sticks to everything.
-
Initial rise : cover that puppy up with plastic wrap and let it sit at room temperature. seriously, just walk away for 12- 18 hours .
When you come back, check for bubbles.
-
Shape the dough : on a floured surface, turn out the dough. this is where that how to shape bread dough magic happens.
Just fold it over a few times until it’s round.
-
Second Rise : Let it rest again for another 1- 2 hours . This puffing up is a good thing!
-
Preheat Your Oven : About 30 minutes before baking, crank up that oven to 450° F ( 232° C) with your Dutch oven inside. You want it hot!
-
Transfer and bake : take your hot dutch oven out. place a piece of parchment paper inside, and gingerly drop your dough on there.
Cover with the lid and bake for 30 minutes .
-
Uncover and Brown : After that, remove the lid and let it bake for another 15- 20 minutes . This gives you that gorgeous golden crust.
-
Cool : Patience, my friend! Let it cool on a wire rack before slicing. I know it’s tempting to cut into it right away, but trust me—waiting improves the texture.
Expert Techniques
You want to achieve that authentic artisan bread vibe? pay close attention to your fermentation duration and watch the temperature control .
It can be a game-changer in your bread's flavor. a longer rest means more flavor complexity. who knew waiting could be so tasty?
When troubleshooting, if your bread isn’t rising, it could be the yeast. check its expiration date. if things don’t look right while baking—like not getting a good bake on the crust—don’t panic.
It happens to everyone! maybe it just needs a little more time or a higher temp.
Success Strategies
A big error is rushing the resting times. please, don’t! the longer it rests, the better the flavor and texture.
And if you’re making this for a special occasion? prepare ahead! you can easily make this loaf a day before you need it.
Always remember to watch your dough. A little too dry? Add a touch of water. Too wet? Dust with a smidge of flour. It’s all about balance!
In the end, this No-Knead Bread: Artisan, Rustic Loaf is your ticket to beautiful, crusty bread at home and perfect for pairing with meals or just slathering on some butter.
Ready to explore more about artisan bread? Let's keep the momentum going! Stay tuned for Additional Information in the world of delicious homemade bread!
Pro Tips & Secrets for Your No-Knead Bread: Artisan, Rustic Loaf
Now, let’s talk about some insider tips and secrets to help you nail that No-Knead Bread: Artisan, Rustic Loaf. Seriously, this is where it's at!
Chef's Personal Insights
As a home cook who's had my fair share of kitchen mishaps, i've learned to embrace the no-knead bread method wholeheartedly.
This technique is super forgiving, which makes it perfect for beginners. my best advice? let that dough rest. seriously, just walk away and don’t rush the natural fermentation process .
The longer it rises, the deeper the flavor and better the texture will be!
Time-Saving Techniques
Here’s a sneaky time-saver: mix your dough the night before! that’s right—whip it up before bed, and come morning, you’ll have a delightful dough just waiting to be shaped and baked.
It really is an easy homemade bread option, perfect for those busy mornings.
Flavor Enhancement Tips
Don’t leave flavor on the shelf! one of my favorite tricks is to toss in fresh herbs or some chopped garlic into the dough.
It adds a punch of flavor that makes your rustic loaf even more special. seriously, who can resist the aroma of garlic bread fresh outta the oven?
Presentation Advice
Okay, so you’ve baked this beautiful loaf, but don’t just plop it on the table! take a second to make it look just as good as it tastes.
Dust it lightly with flour or cornmeal before baking to give it that artisan bread recipe vibe. slice it on a wooden board and maybe even drizzle a little olive oil on the side for dipping.
Your friends will think you’ve been baking for years!
Perfect Presentation
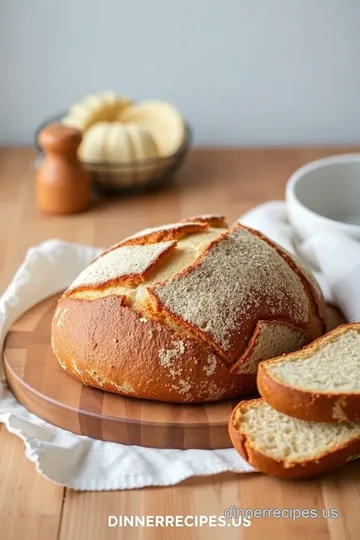
You’ve crafted your homemade rustic bread , and now it's all about making it shine. Presentation is key!
Plating Techniques
Use a simple, clean cutting board for serving. Arrange slices neatly, maybe in a fan shape. Looks gourmet but is totally easy!
Garnish Ideas
A sprinkle of herbs or a few olive oil drizzles can do wonders. fresh rosemary or thyme will elevate your loaf like you wouldn’t believe.
Just think, “what would a fancy restaurant do?”
Color Combinations
Pairing is everything! Serve with a vibrant salad or alongside a rich stew. Color pops elevate your bread from simple baking techniques to a meal fit for a king!
Visual Appeal Tips
Lighting matters too! Serve your warm loaf in a bright spot or near a window—natural light showcases that beautiful crustiness.
Storage & Make-Ahead
Now let’s keep your crusty bread at home fresh for longer.
Storage Guidelines
Once your loaf is cool, wrap it up in a kitchen towel, not plastic! This keeps that crust nice and crunchy.
Preservation Methods
If you want to keep it for a few days, stash it in a brown paper bag. For longer storage, slice and freeze! Just pull out slices as you need them.
Reheating Instructions
To revive that crusty goodness, pop it back in a heated oven for a few minutes. Your kitchen will smell like a bakery again!
Freshness Duration
Generally, your bread will stay fresh for about 2-3 days at room temperature. In the freezer, it can last up to three months—if you can resist not eating it all first!
Creative Variations
Don't be shy! Experimenting is where the fun is at.
Flavor Adaptations
Feeling adventurous? Add sunflower seeds or even cheese! A little cheddar transforms your rustic loaf preparation into something magical.
Dietary Modifications
Want to go whole grain? Swap in whole wheat for your all-purpose flour. Looking for gluten-free options? You can find flour blends that work just as well!
Seasonal Twists
In fall, add pumpkin puree or spices. For summer, fresh tomatoes and basil blend beautifully.
Regional Variations
Trying a Dutch oven bread baking approach? Mix in local ingredients that speak to your area. Making it your own is part of the fun!
Complete Nutrition Guide
Let’s get into the nitty-gritty of bread nutrition!
Detailed Breakdown
Each slice is about 150 calories , offering a hefty dose of flavor without a lot of fuss. Just check your ingredients to keep it healthy.
Health Benefits
Homemade artisan bread has no preservatives! It’s made with love, and you know exactly what’s in it.
Dietary Considerations
Keep an eye on portion sizes. If you're in the mood for a treat, enjoy that chewy bread texture, but maybe pair it with a salad.
Portion Guidance
Eight servings from one loaf? Perfect for sharing or saving for a cozy evening in.
Expert FAQ Solutions
Got questions? I’ve got answers!
Common Questions
“Can I use regular yeast instead of instant?” Absolutely! Just activate it first with warm water.
Troubleshooting Guide
Bread too dense? You may not have let it rest long enough. Remember, patience is vital in simple baking techniques .
Success Tips
Stick to the ratios and trust the process. Your loaf will tell you when it’s ready!
Variations Explained
Feel free to get creative! Every cook makes it their own, and that’s what makes experimenting with bread recipes so delightful.
Conclusion: Bake with Confidence!
So there you have it! this no-knead bread: artisan, rustic loaf is a charming way to bring homemade goodness to your table.
With easy-to-follow steps and delightful variations, you’ve got everything you need to impress. i hope you feel excited to get started—you've got this! embrace the experience and happy baking!
No-Knead Artisan Rustic Loaf: Effortless Bread Mastery Card
⚖️ Ingredients:
- 3 cups (360g) all-purpose flour
- 1 ½ teaspoons (8g) sea salt
- ½ teaspoon (2g) instant yeast
- 1 ½ cups (360ml) lukewarm water
- 1 tablespoon (15ml) olive oil (optional, for greasing the bowl)
- Cornmeal or flour (optional, for dusting)
🥄 Instructions:
- Step 1: In a large mixing bowl, whisk together flour, salt, and instant yeast until evenly combined.
- Step 2: Gradually pour in lukewarm water and mix until a shaggy dough forms.
- Step 3: Cover the bowl with plastic wrap or a kitchen towel and let it rest at room temperature for 12-18 hours or until bubbles form on the surface and it has doubled in size.
- Step 4: On a floured surface, gently turn out the dough. Fold it over on itself a few times, shaping it into a round.
- Step 5: Let the shaped dough rest on a floured surface for about 1-2 hours, until it has puffed up slightly.
- Step 6: About 30 minutes before baking, preheat the oven to 450°F (232°C) with the Dutch oven inside to heat up.
- Step 7: Carefully remove the hot Dutch oven, place the parchment paper in it, and transfer the dough onto the parchment. Cover with the lid and bake for 30 minutes.
- Step 8: Remove the lid and bake for an additional 15-20 minutes until the crust is golden brown.
- Step 9: Let the bread cool on a wire rack before slicing.
Previous Recipe: How to Bake Butter Chicken Pot Pies Delightfully: A Cozy Family Recipe
Next Recipe: Ultimate Soup Red Lentils Creamy Coconut Delight: 5 Easy Secrets!